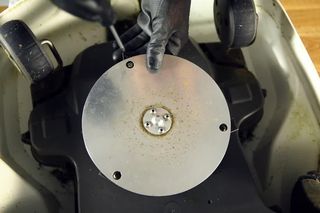
How to change the cutting blades on your Automower® robotic lawn mower
When the blades become worn, or when the tip of the grass blades begin to whiten and look frayed when cutting, you should change the blades on your robotic lawn mower to maintain performance. Make sure you always use original blades and screws, and always replace the screw at the same time as the blade when carrying out maintenance, otherwise the screw can be worn out and cause the blade to come loose when operating.
Step-by-step guide to changing blades
- Make sure the main switch is turned off.
- Wear protective gloves.
- Turn the robotic lawn mower upside down.
- Rotate the skid plate so that its hole aligns with the screw for the blade.
- Unscrew the blade. Use a straight slot or cross-tip screwdriver, preferably magnetic for easier removal of the screw.
- Pry apart the skid plate and blade disc a little and remove the blade and screw.
- Clean out any dirt using a dish-washing brush and a soft damp cloth.
- Screw the new blade tight with a new screw. Always replace the screw as well as the blade.
- Be careful to only use one blade with each screw, otherwise the cutting system may become unbalanced.
- Check that the blades spin freely.
What is the lifetime of Automower® cutting blades?
The normal lifetime of Automower® cutting blades is 3 to 6 weeks when used under favourable conditions, but the lifetime of the blades varies and depends for instance on:
- Blade model. For example, Husqvarna Automower® Endurance blades provide three times the lifetime compared to classic Automower® Blades, and Husqvarna Endurance HSS Blades even longer.
- Operating time and size of the work area.
- Type of grass and seasonal growth.
- Soil, sand and use of fertilisers.
- The presence of objects such as cones, windfalls, toys, tools, stones, roots, etc.
What happens if I do not change the blades on my Automower® robotic lawn mower?
Working with blunt blades gives a poorer mowing result. The grass is not cut cleanly and more energy is needed, resulting in the robotic lawn mower not mowing the expected area size.


