- Step 1. Download the Automower® Connect app
- Step 2. Pair the mower with the app
- Step 3. Place the charging station
- Step 4. Charge the mower
- Step 5. Lay the boundary and guide wire
- Step 6. Connect the boundary wire and the guide wire to the charging station
- Step 7. Connect the guide wire to the boundary wire
- Step 8. Set a schedule in the app and start mowing
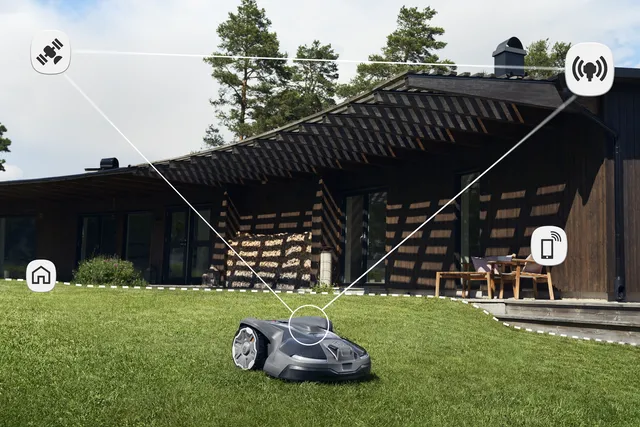
- Connectivity
Husqvarna Automower® quick installation guide
Maximise your mower's potential by ensuring a correct installation in your garden. Here is our easy to follow, step by step guide and instructional video to help you during a boundary wire installation.
Video guide

Step 1. Download the Automower® Connect app
Step 2. Pair the mower with the app
Turn your mower on and follow the instructions in the app. Note: If your mower has low battery then complete this after step 4.
Step 3. Place the charging station
Locate the best place for the charging station. This needs to be placed on a flat level surface with an open area in front of it. Connect the power supply’s low voltage cable to the charging station and the power supply, then connect the power supply to a 100-240 V wall socket.

Step 4. Charge the mower
Plug in the charging station, then place the mower in it and turn on to charge. You will be able to see in the app that the mower is charging.

Step 5. Lay the boundary and guide wire
Lay the wire:
- 10 cm (4 in) from obstacles that are lower than 1 cm (0.4 in) e.g. a pathway
- 30 cm (12 in) from obstacles that are between 1 - 3.5 cm (0.4 - 1.4 in) high e.g. a flowerbed
- 35 cm (14 in) from obstacles that are higher than 3.5 cm (1.4 in) e.g. a wall

Step 6. Connect the boundary wire and the guide wire to the charging station
Note: Automower® Aspire™ R4 must have a guide wire installed and this needs to be attached to the underneath of the charging base plate using the three clips.
Open the connectors and lay the wire ends in the recesses on each connector. Press the connectors together using a pair of pliers. Then cut off any surplus boundary wire: 1-2 cm (0.4 - 0.8 in) above the connectors.
Press the connectors onto the contact pins marked L (left) and R (right) in the charging station. It is important that the right-hand wire is connected to the right-hand contact pin, and the left-hand wire to the left-hand pin. Then fasten the connector to the contact pin marked GUIDE on the charging station.

Step 7. Connect the guide wire to the boundary wire
Yellow flashing light - (Automower® Aspire™ R4 only) Malfunction in the guide wire.

Step 8. Set a schedule in the app and start mowing

Connectivity
- Bluetooth for connectivity within a 30 metre range of your mower.
- Wi-Fi for connectivity anywhere while your mower is connected to Wi-Fi.
- Cellular for connectivity anywhere.